It’s critical to have an online presence for your business. Ideally, you should have a website or a blog to connect with you customers, clients or your readers. To build your website, you need domain and hosting. And In this article, I will guide you step by step how to buy hosting from Bluehost – a reliable and reputable hosting registrar.
Bluehost is one of the largest hosting providers in the world. And currently Bluehost is providing hosting for more than 2 million websites worldwide.
Bluehost is trusted by many users because of its friendly interface, reasonable cost, 24/7 online customer care service and attached add-on package.
In addition, Bluehost is always the preferred choice for many businesses because besides providing hosting services, Bluehost also provides users with many attached services such as cloud site, VPS hosting, WooComerce hosting, etc.
In this article, I will tell the reason why I use Bluehost for most of my sites and my clients’ as well as detailed instructions on how to buy hosting from Bluehost .
What's in this guide?
What Is Hosting And Domain?
To create a website you need 2 main elements: domain and hosting. Building a website is similar to building a house. You need the following factors:
- Home address – Domain : the digital address of your website.
- A land to build your house – Hosting: site hosting provides web owner a space on a web server to store all of its files.
- In addition, you’ve heard about Theme – it is likely the design your house. You can use free Theme from WP or buy a premium theme from ThemeForest, Astra, Divi, generatepress and Genesis Framework
When someone enters your domain name in a browser, the domain name is translated into the IP address (a combination of numbers separated with dots) of your web hosting.
In the article I will go specifically about Hosting, and the provider I am using currently for most of my websites is Bluehost.
Why You Should Buy Hosting From Bluehost?
- Bluehost is rated as one of the best hosting providers that support WordPress.
- High quality customer service. 24/7 customer care, you can directly chat live with the technical support team or ask them to call you directly. If you don’t know how to install or connect your website to WordPress or even know how to use the admin panel, you can chat with Support Team, they are very helpful and supportive.
- Free integration of SSL (https) service. As you know, Google currently highly values websites that use https, and website owners should integrate https to create security for your website and for users. When you buy hosting at Bluehost, you will get completely free HTTPS integration for your website.
- Free domain name for the first year.
- Variety of plans ideal for scalability.
- Bluehost interface is user-friendly.
- Most plans include unlimited disk storage, unlimited websites, and bandwidth.
There are plenty of exciting features and free add-ons included in Bluehost package. The majority of customers are quite happy with Bluehost’s services including me.
How To Buy Hosting From Bluehost
Step 1: Choose A Hosting Package
Go to Bluehost ‘s website => select “Get Started” . The hosting package window will appear (as picture below). Please read carefully the information of each package to choose the most suitable option for you.
First you need to decide if you are going to buy package of 12 months, 24 months or 36 months. Normally, when I buy a domain or hosting, I will go for 24-month package, neither too long nor too short. After two years, I will renew if the service is good, otherwise I’ll change to another domain and hosting providers.
After choosing how long your package is, read carefully the information included in each package.
- Basic package : this package can only host 1 single website (50 GB). Get 1 year free domain and free SSL (https)
- Plus package : this package can host multiple websites on the same server, unlimited GB, free domain for 1 year, free SSL, trial 1 Microsoft 365 Email for 1 month.
- Choice Plus package: host multiple websites on the same server, the attached service is similar to the Plus package but with additional domain security, free auto backup for 1 year.
- Pro plan: the same services as the Choice Plus plan and adds CodeGuard auto backup for long-term websites, free dedicated IP address, providing CPU with stronger and faster processing speed.
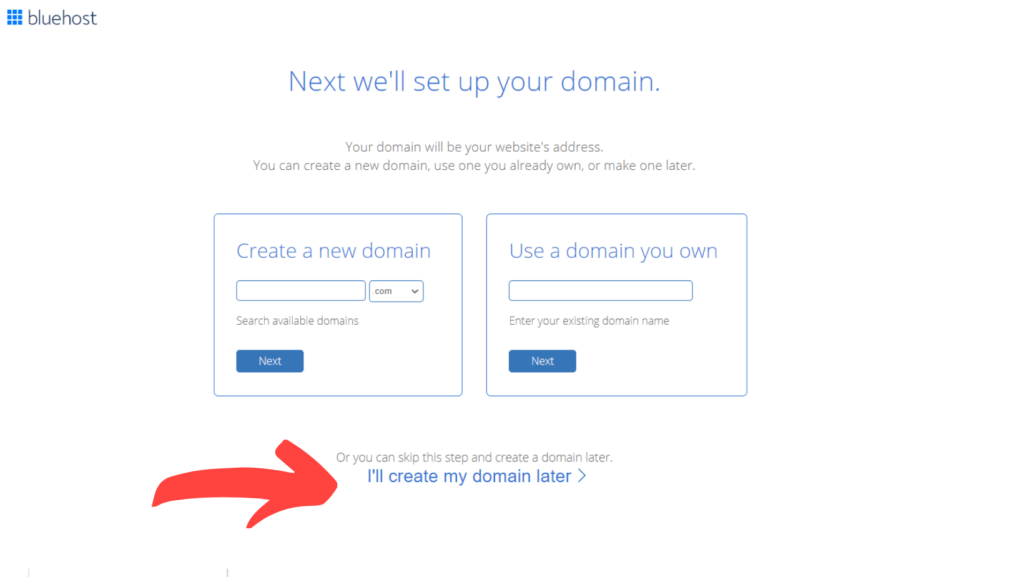
After choosing the hosting package, you will be navigated to “setup domain page”
- Select “Create a new domain” to create a new domain you buy directly from Bluehost (free for the 1st year).
- Select “Use a domain you own” if you already have a domain purchased from another provider and want to point it to Bluehost.
- However, you can skip this step and do it later by selecting “I’ll create my domain later”
Step 2: Create An Account
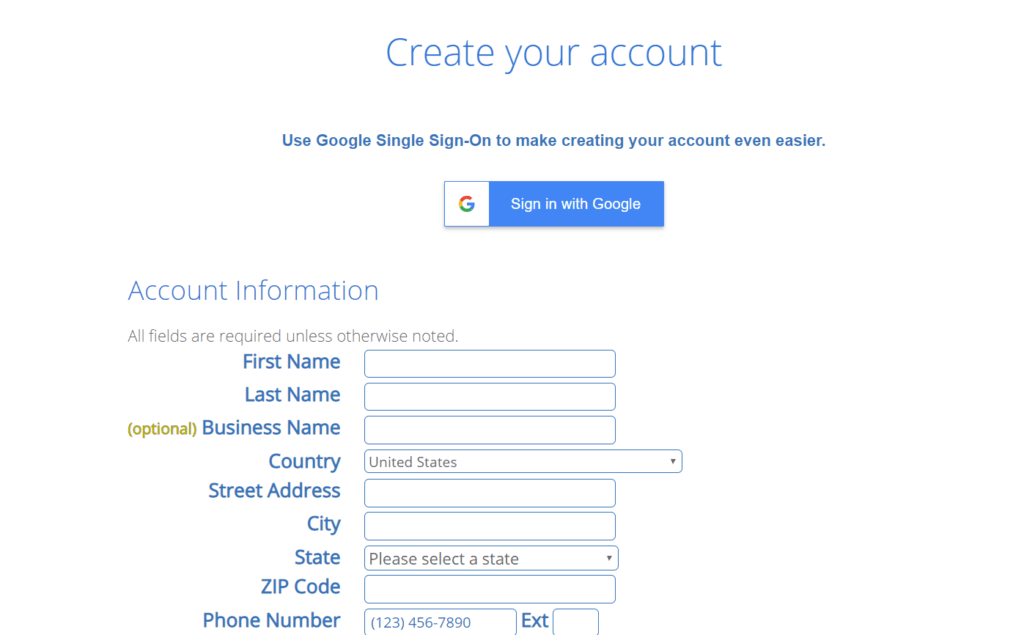
After skipping the domain setup step, you will be navigated to “Create your account”. Fill in your personal information including: First name, last name, country, address, postal code, phone number and email.
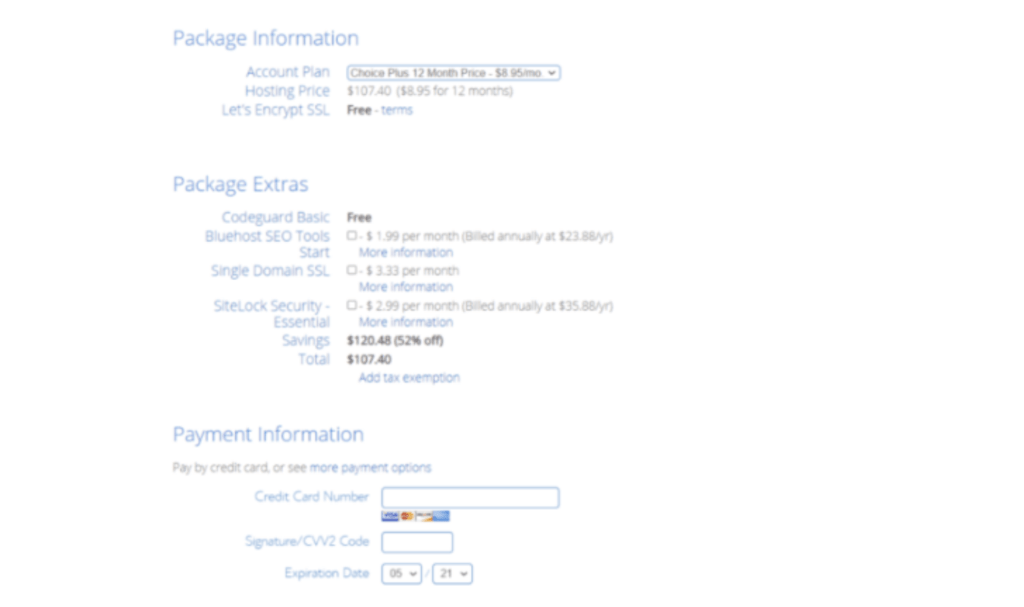
Below, Check the package information and choose the add-on services you want to use.
- Package Information: Check again how long your package is.
- Codeguard Basic : This is free if you buy Choice Plus plan or Pro. CodeGuard allows you to backup your data every day.
- Bluehost SEO Tools: Copyright Tool from Bluehost supports SEO for your website.For beginners, I recommend the free version of Yoast SEO which is quite good.
- Single Domain SSL: your domain will be integrated with free basic SSL. However, if you need more security, you can purchase this SSL.
- SiteLock Security: Sitelock provides protection to your website from malicious attacks, spammers and hackers. It is an automatic monitoring tool that guards your site against landing on search engine blacklists, detects malware and protects you from costly downtime.
Next, fill in your Credit Card information => Tick the box to agree with the terms of Bluehost => Select “Submit “
Step 3: Pay And Login:
After making the payment, check you email inbox. Bluehost will send an email including your payment bill and account information such as: Username, host, name server, etc. and a link to change the password.
Now log in the Bluehost dashboard as shown below.
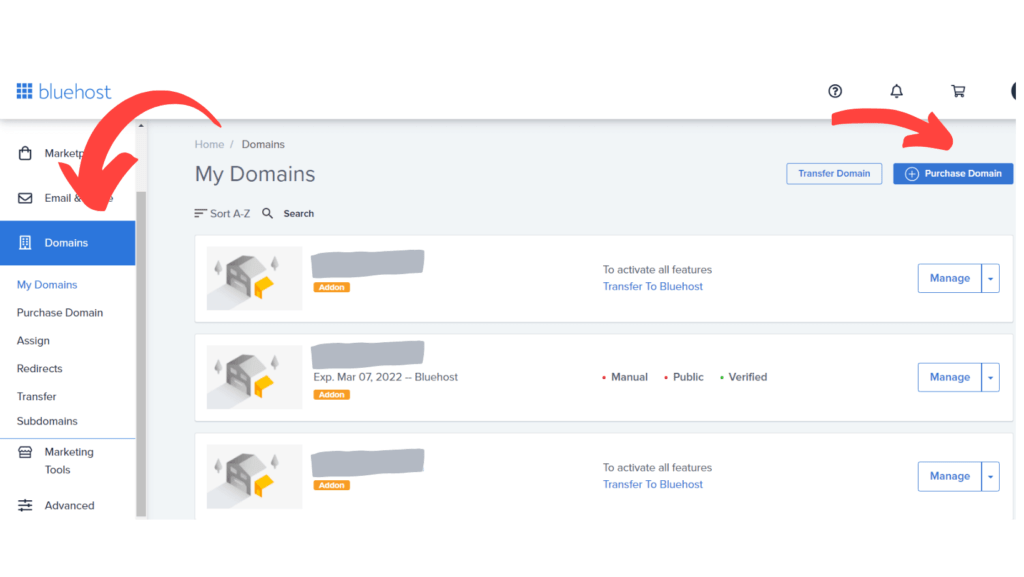
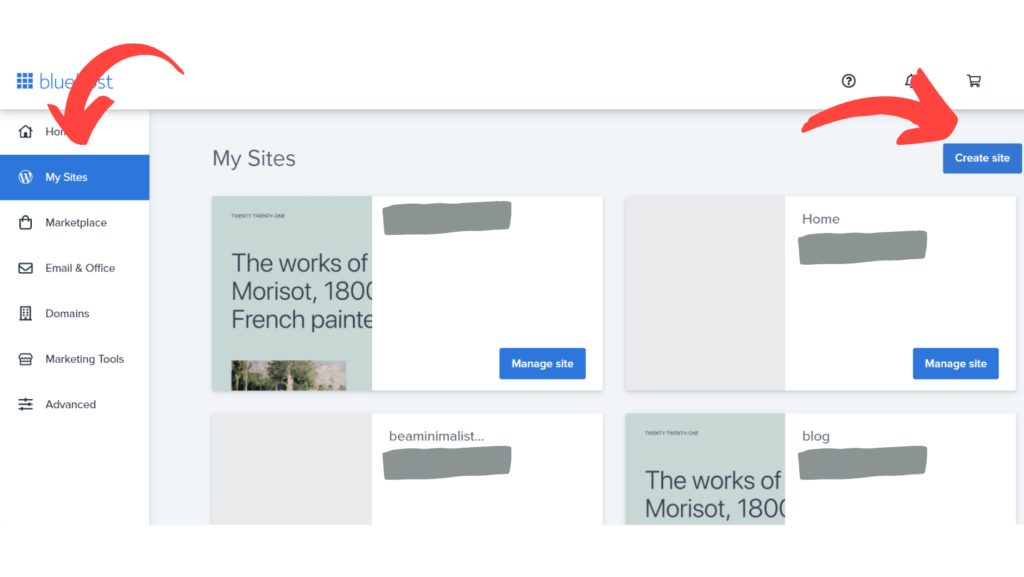
On the menu bar on the left you can add a domain in the “My sites” section, you can buy a domain or point the domain from other providers through Bluehost in the “Domains” section.
If you haven’t bought Bluehost’s 1-year free domain yet, you can buy it in “domains‘ section. However, please note, Bluehost’s domain is free for the first year, in the second year when you renew, the cost may be more expensive than other domain providers. To purchase a cheap domain, check out Namecheap, and the detail guide here: how to buy a domain name at Namecheap.
The steps to buy a free domain are as follows:
- Select “Domains”
- Select ‘Purchase Domain‘
- Type in the domain name you want to buy => Select “Check”
- If the domain has not been purchased yet, it will show “Available” for everyone.
- People still put it in the shopping cart as usual, but the cost will be zero, so you don’t have to pay anything.
How To Connect WordPress In Bluehost
Step 1: My Sites => Create Site:
You select “My Sites” on Bluehost dashboard. In this My sites section you can connect your site to WordPress. Select “Create Site” in the upper right corner.
If you have already connected the site to WP, then you will see your website with the “Manage site” button (as shown above) => you select Manage Site and select Log in with WordPress which will lead you to the WP admin panel to Write articles and manage the website.
If you haven’t connected the site to WP, follow step 2 below.
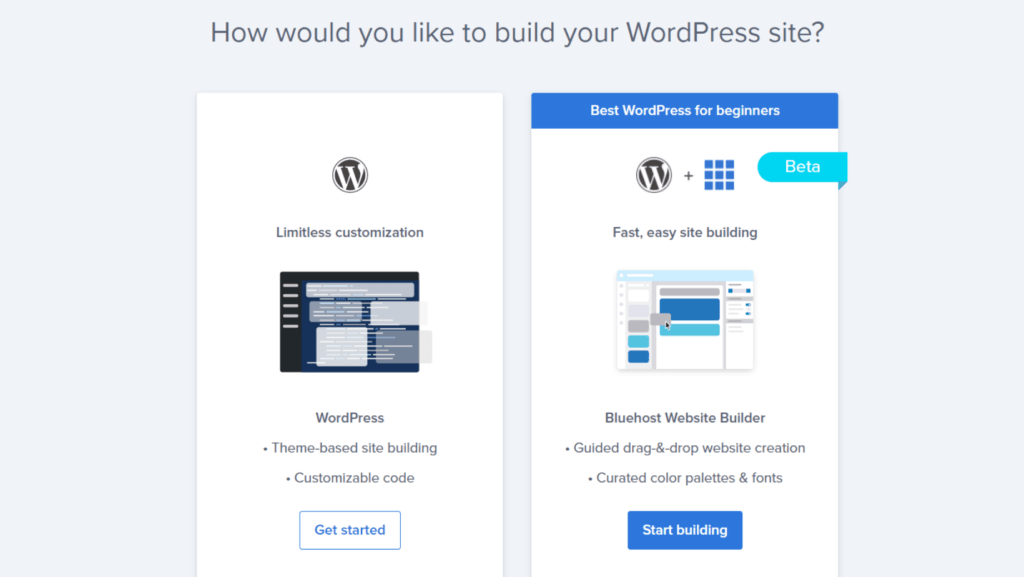
Step 2: You Choose The First Column => Get Started
I will opt for the first column “WordPress”. The second column as I read the instructions, Bluehost will guide you step by step to complete the setup of your website in the admin panel. Since I work with the WP admin panel a lot, I don’t need to use this beta panel. I will select the first column as WordPress and click “get started”
Step 3: Enter Domain And Tagline Tag
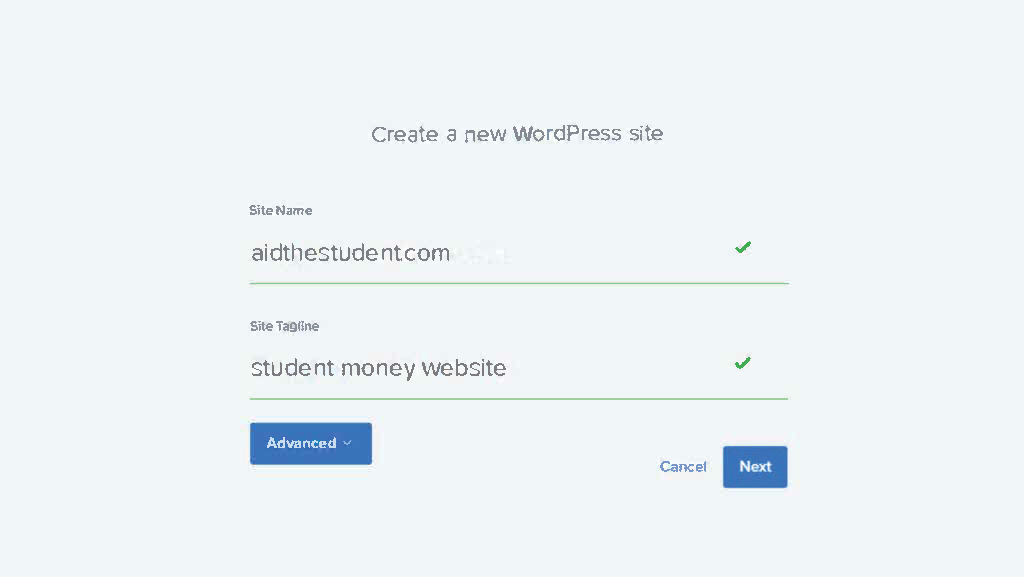
You enter your website name and enter the Site Tagline. A tagline is a brief introduction of your website that can include your website’s main keyword. You can edit this tagline section later on the WordPress admin panel.
Step 4: Choose A Domain
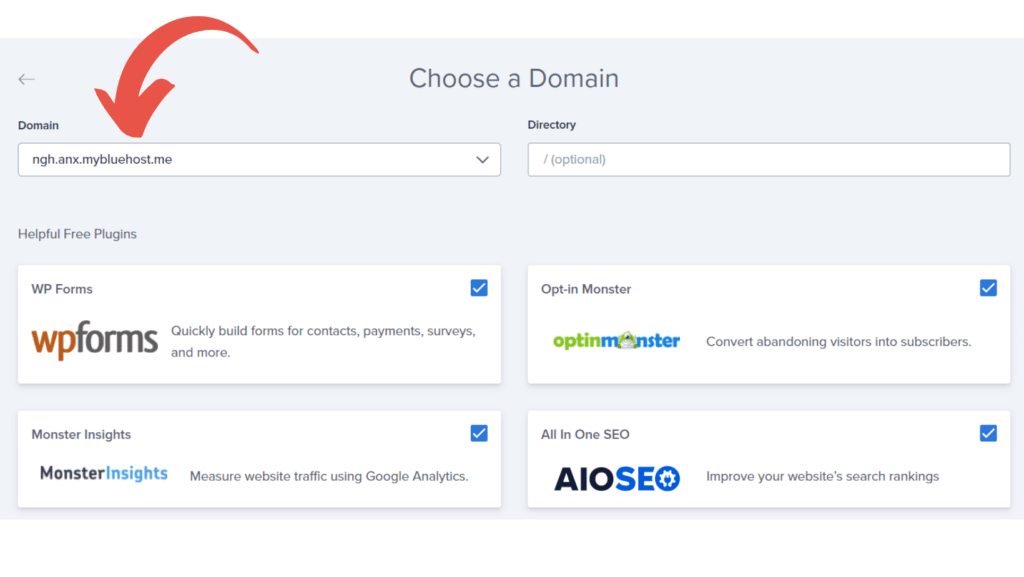
You click on the Domain on the left and select the correct domain that you entered in step 3 above. You can leave the directory blank => then select “ Next ” at the bottom to perform the next step.
After installing step 4, the screen will display a message that WordPress has been installed. And yeah, you finally have your first blog.
You can select “Login to WordPress” to go directly to the WordPress admin panel to start your first blog.
If you have not installed it or do not want to install it yourself, you can ask Bluehost support team to install for you which will take only 2-3 minutes.
Bluehost Live Chat Guide
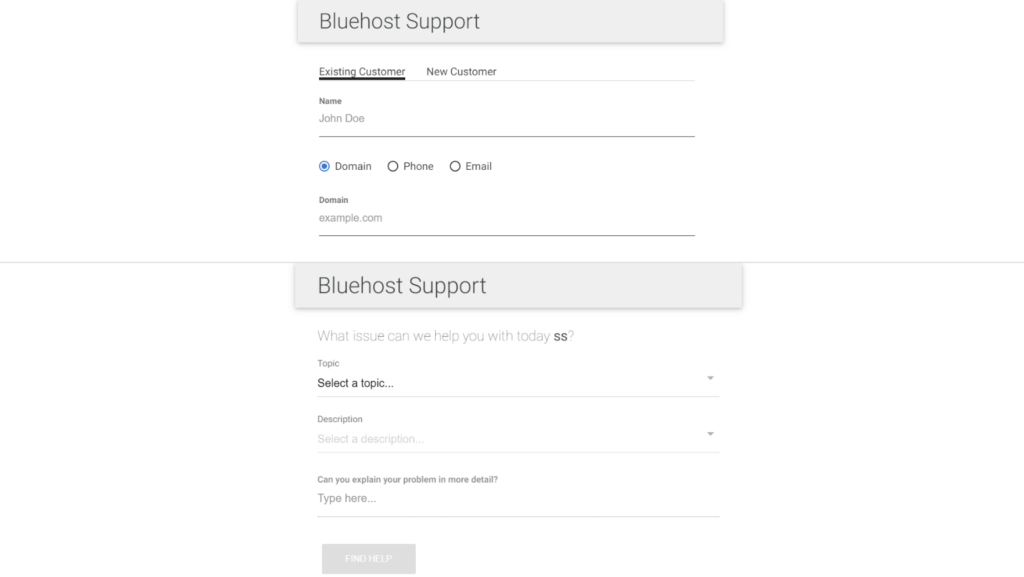
Step 1: Go to Bluehost. Click on the word “Chat” in the upper right corner,
Step 2: Enter your name, select support type (chat, email, phone). Enter your domain name => Select Next
Step 3: Select topic (your issue), choose description, and explain more detail. Just make it quick and short to enter the chat room, in the chat room you have to describe your issue again, so don’t waste to much time in this step.
Step 4: Select Find Help => then continue to select Start Chat
Step 5 : Once you enter the chat room, you only need to wait for 1 -3 second, there will be somebody join the room. You will be asked to share your domain or email. A token code will be sent to you email. Check you inbox and copy that token and paste in the chat box to verify your account. After that, you can describe you issue in detail to get the fastest support.
If you find the article useful, don’t forget to comment and share. Wish you a wonderful blogging journey!


